
How I Made “The Shy Machine”: An Interactive Kinetic Light Sculpture That Moves, Learns, & Reacts
by Daric GillThe Shy Machine is a motion activated, sound reactive, environmentally adaptive, kinetic light sculpture. As its name would suggest, this robot is shy. The two halves of this 12-sided geometric form open and close depending on the noise levels in the environment. Vibrant lights pulse from within according to volume in the room. The insides are packed with electronic brains, lights, and sensors to make this happen. In this article, you can explore the build process from start-to-finish.{Time-Lapse Video of Process Above}
{Process Image Gallery Below}

{To see the finished piece in action, click here}
 Which shape to use for the final sculpture? What kind of geometry will I have to learn for this? Protractors and math tutorials are all I’m working with at this stage.
 Designing what will later be the Shy Machine at my local Staufs Coffee Roasters.
 Settled on a design prototype: An unequal and twisted hexagonal trapezohedron antiprism. Later I’ll truncate the design.
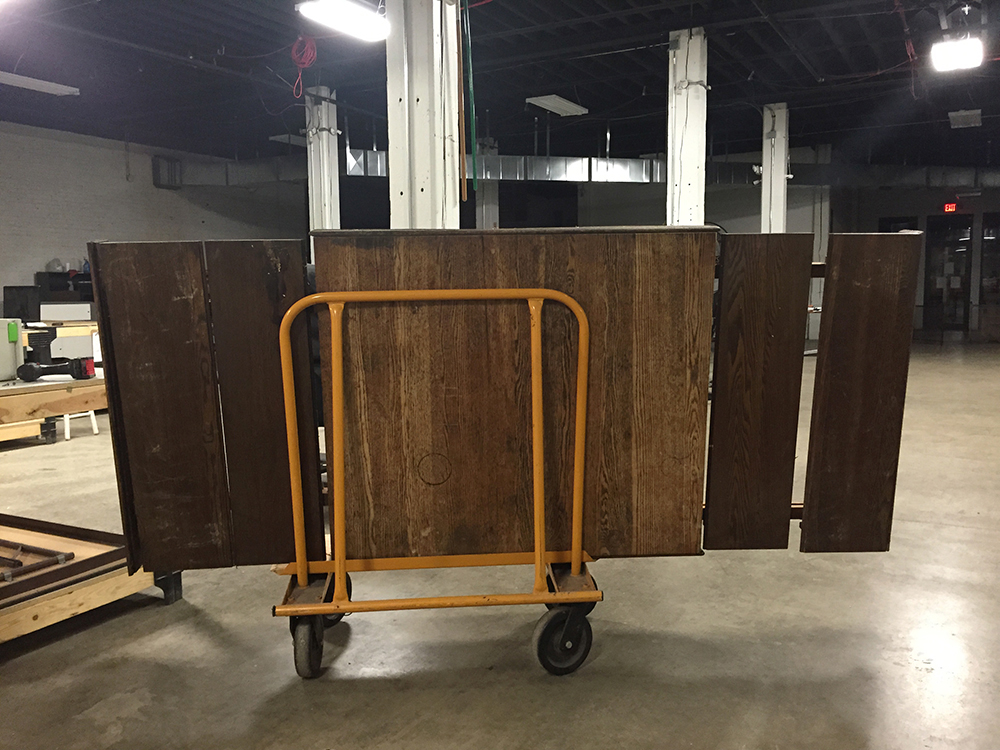
 Fresh from the side of the road! An antique table and leaf extensions from the late 1800s! This will sit in my garage for 4 years before I’ll know what to do with it.
 Fresh from the side of the road! An antique table and leaf extensions from the late 1800s! This will sit in my garage for 4 years before I’ll know what to do with it.
 Disassembling a table from the late 1800s to be used as the main body of this sculpture.
 Disassembling a table from the late 1800s to be used as the main body of this sculpture.
 About to reclaim a 130 year old table top!
 All the pieces that I could use that didn’t have structural damage, old bug damage, or major dry rot.
 Sanding before the planer removes some pretty sticky lacquer. Jigsawed in half to maximize usage of straight grain instead of nesting all the designs together.
 New… old… wood.
 Prototyping the electronics: Arduino + Adafruit motor shield + tiny stepper motor + 2 different mic sensors. Which one is better?
 Prototyping the electronics: Arduino + Adafruit motor shield + tiny stepper motor + 2 different mic sensors. Which one is better?
 Prototyping the electronics. Arduino + Adafruit motor shield + tiny stepper motor + mic sensor + Neopixel LED strip
 Prototyping the electronics. Arduino + Adafruit motor shield + tiny stepper motor + mic sensor + Neopixel LED strip
 Prototyping the electronics. Arduino + Adafruit motor shield + tiny stepper motor + mic sensor + Neopixel LED strip
 Calculating and re-calculating angles. Scrap wood prototypes before using 130 yr old wood.
 Laser cut templates to be used as guides for a router. CNC machine has a major line… I’ll do it by hand.
 The acrylic template on the hand routered pieces of wood.
 Stacked pieces of reclaimed wood. (to be the bottom half)
 Debating if I’d like to do another project with just repeatable shapes. Discovered the term parametric.
 Dry-mounted pieces show my math was pretty spot on! Whew!
 Dry-mounted pieces show my math was pretty spot on! Whew!
 Lacquered up each section. This actually came later in the process, but makes more sense in this order.
 Hand-made brackets made from an access panel pulled from another piece of electronics work I made 12 years earlier.
 So many hand-made brackets!
 Homemade brackets are in place.
 First look at the 2 halves together!
 New parts delivered! 120 VAC to 12VDC power supply, lead screw, 5VDC buck converter, 2 versions of a shaft coupler, and shaft bearings.
 Laser cutting parts for the circuit board enclosures. Some needed redesigned, others were fine.
 Testing out beefier stepper motor driver! The Big Easy Driver by Sparkfun replaces the lower powered Adafruit Motor shield.
 Testing out new 120 VAC to 12 VDC power converter and high amp 5 VDC buck converter
 So many laser cut pieces!
 New custom designed encasement for the Arduino + Big Easy Driver (stepper motor driver)
 New custom power supply encasement. Fresh off the laser cutter.
 Piecing together custom laser cut enclosures on the base layer
 Piecing together custom laser cut enclosures on the base layer
 The top piece of acrylic was the most challenging to line up exactly with the rails, lead screw, and base level electronics. It took 5 iterations before all design complications and laser misalignments were figured out.
 Do I have enough mirrored acrylic? Maybe…
 Hand-made brackets reshaped from cushion mounts pulled from vintage Samsonite folding chairs
 Laser cut middle and top sections as well as mirrored surfaces for the inside walls
 The bottom half gets mirrored
 My first real view of the top down approach with nearly all electronic components in the base layer
 Internal view without the LEDs mounted or top and middle layers of acrylic
 Preparing newly mirrored top section for top layer of acrylic
 Measuring and leveling mounting hole placement for the top acrylic piece
 All major components have a place… right?
 Transporting this delicate machine required some hi-tech safety procedures
 Wiring up the RGBW Neopixel LED strips
 Building the PIR sensor and mic sensor brackets
 Detail of mic sensor bracket back
 Mounting PIR sensor and mic sensor brackets
 Eyeballing placement for 2-channel relay switch (the board w/ 2 blue boxes on left)
 Wiring in the 2-channel relay switch that controls the power to LEDs and stepper motor controller
") The internal components, while they wait for action.
The internal components, while they wait for action.") Internal electronics in red light
Internal electronics in red light") Detail shot of the passive infrared sensor (motion sensor)
Detail shot of the passive infrared sensor (motion sensor)") “The Shy Machine”: Fully opened in the Soft Volume Position. Slow undulations of rainbow light.
“The Shy Machine”: Fully opened in the Soft Volume Position. Slow undulations of rainbow light.") “The Shy Machine”: Fully opened in the Soft Volume Position. Slow undulations of rainbow light.
“The Shy Machine”: Fully opened in the Soft Volume Position. Slow undulations of rainbow light.") “The Shy Machine” opens midway for middle volume levels. Displays blue-green pulse.
“The Shy Machine” opens midway for middle volume levels. Displays blue-green pulse.") “The Shy Machine”: Midway opened in the Middle Volume Position. Moderate undulations of blue-green light.
“The Shy Machine”: Midway opened in the Middle Volume Position. Moderate undulations of blue-green light.

It’s an extreme honor to be featured by such a leader of the industry. I’m truly grateful!
LikeLike