“Absolute: Connection”: Oil paint on beech wood. 16” x 8”. 8.7.19.
Three round elements of color sit behind a central twig. These circles are positioned where a weathered branch and the background meet. The largest circle is a slightly translucent shade of cool white. A smaller pale green circle marks the point of contact for the smaller chute of the twig. Grounding the longer section of the twig is a slightly smaller, yet more chromatic blue circle. A faint white ring sits just outside the blue hue. The twig is frozen in a timeless bend, casting a stark ‘S’ shaped shadow to the right. The circles all have a unique quality, sharing in visual dominance. Their controlled geometry complement the organic twist of the twig. As the stick gets thinner, a green tint takes over the wood, indicative of tiny living fungi. Growth and deterioration, symmetry and off-axis, connections and extensions– each part of the visual language in Absolute: Connection. Read on below for the full article and image gallery.
“Absolute: Elevation” Finds Reverence In Shared Reflections From Germany
by Daric Gill
{Feature Video of Painting Process Above}
“Absolute: Elevation”: Oil paint on reclaimed oak. 8 3/4” x 9 7/8”. 7.30.19.
If you spend time near a lake or river you’ll see people stooping down to pick up rocks and chucking them into the water. There appears to be something timeless and wholesome about digging in the dirt to find that perfect stone and casting it into the mirrored surface. And let’s not forget about that satisfying ‘kuthwunk’ sound as it plunges deep into the water. Parents have taught their children the art of the stone toss across the globe, skipping the rocks across the smooth surface. We universally love the game of counting skips and challenging ourselves to outdo the last throw. There’s something so primal yet sophisticated about this self-grounded relaxation. Absolute: Elevation finds reverence in these shared reflections. Read on below for the full article and image gallery.
New “Absolute: Distraction” Painting: In Pursuit Of Memories From Germany
by Daric Gill
{Feature Video of Painting Process Above}
“Absolute: Distraction”: Oil paint on cherry. 20 1/2” x 13”. 7.20.19.
Absolute: Distraction is my newest painting, made while on a three-month residency abroad in Dresden, Germany. Each day I breathe in the city, people, and their artwork. I’m reminded of how precious and beautifully ephemeral time is. It has me considering the delicate balance that’s required in creating memories; the interplay between the care-free absorption of the moment while being fully aware of its short-lived nature. “Absolute: Distraction” looks at that pursuit and the complexities of preserving those special moments. Read on below for the full article and image gallery.
How I Built It: Old Airplane To Contemporary Light Sculpture That Connects To NASA & Rest of The World
by Daric Gill
{Time-Lapse Video of Process Above}
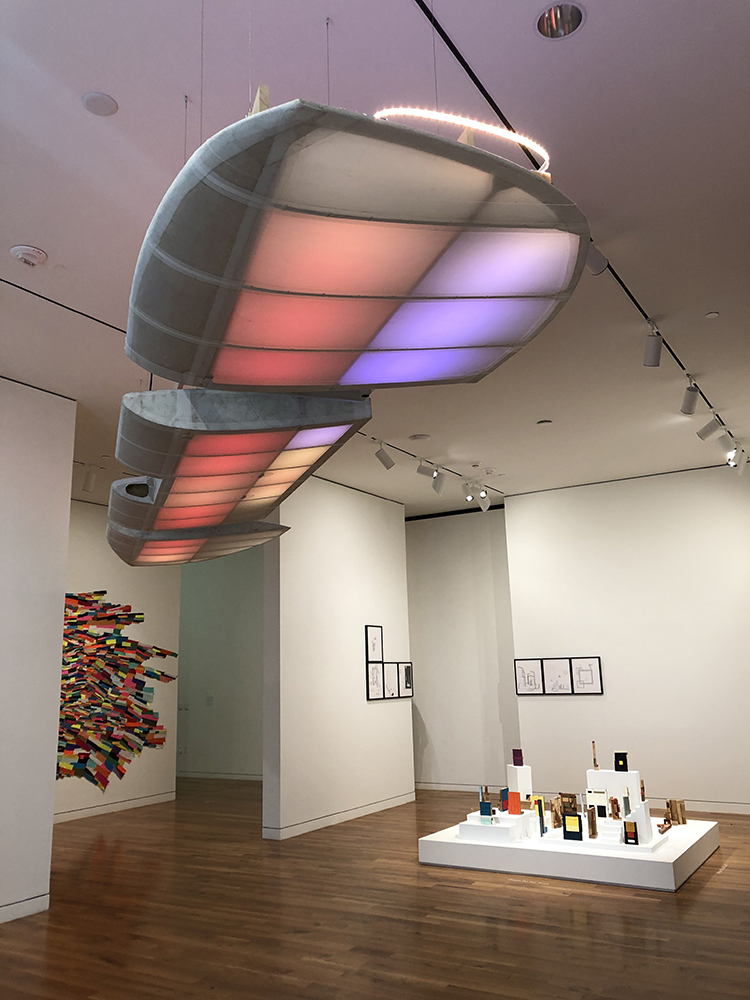
Installed at the Columbus Museum of Art
The Imagination Machine is an interactive sculpture that communicates with NASA, is motion sensitive, tells time, and has a feature that can be remotely controlled from anywhere in the world. It’s made from one of the two wings of a Flying Flea aircraft, strips of individually programmable LEDs, and the brains of a Wi-Fi enabled robot. Part of The Living Machine series, this responsive sculpture takes a look at the emotional intelligence of imagination, as displayed by a robot.
A wooden truss supports the wings, lights, and electrical controls from above. There are two acrylic cases that are packed with brains, power supplies, and sensors to make this sculpture work. In this article, you can explore the build process from start-to-finish.
About The Wing
The plane without the wings attached.
At almost 19 ft long ( ~5.8 m), this wing is one of two pulled from a real bi-plane. The Flying Flea, or (Pou du Ciel literally “Louse of the Sky” in French) is a large family of light homebuilt aircraft. The plane was a generous donation by Mark Curtner in connection with the Historic Grimes Field Airport in Urbana, Ohio. Ohio’s only airport with 3 Museums on Field: The Champaign Aviation Museum, the Grimes Flying Laboratory, & Museum and the restoration wing of the Mid America Flight Museum of Texas.
As you can see from the photos in this article, the wing is segmented into 3 parts (two shorter wing ends + longer middle section). This allows the wings to fold up and inward for tighter storage.
In truth, this wing is actually the ends from one wing and the center from the other. The remaining middle section had some primer on it, rendering it no longer translucent enough that light would pass through. Any pilot will notice that the wing is also flipped upside down, showing the sexier rounded edge to the viewer below.
The Electronics
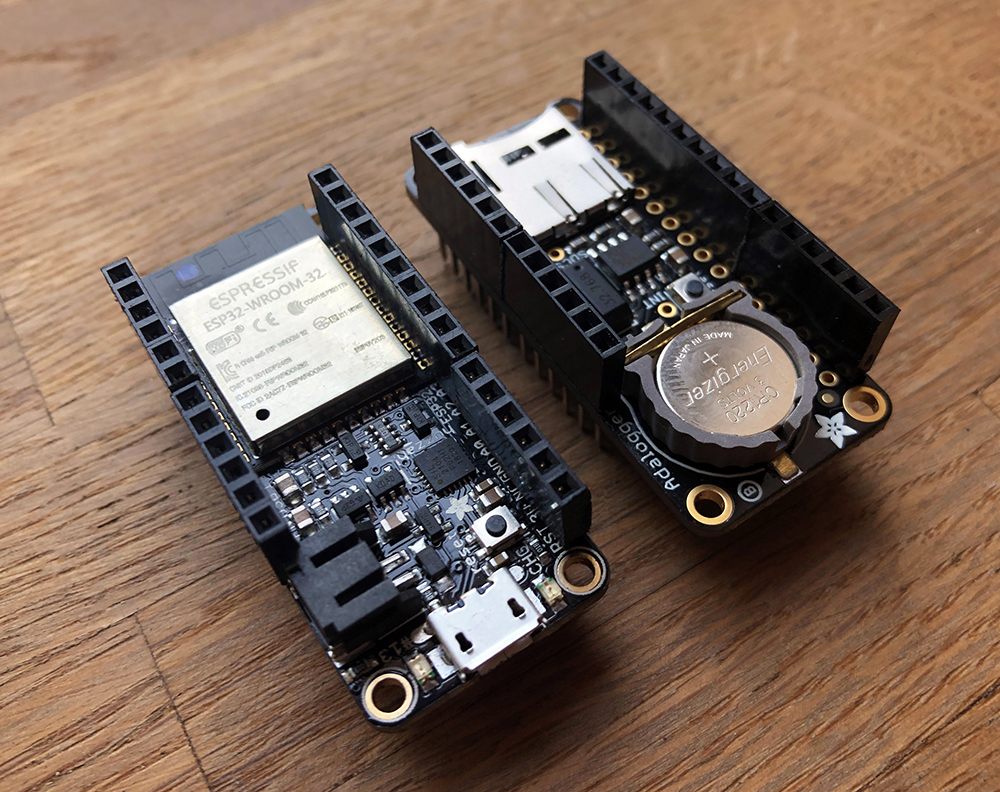
While the wing itself is split into three parts, the electronics are split down the middle in halves. Each half has a separate Wi-Fi enabled brain, corresponding lights, and electronic hardware. The brain holds around 27 pages of codes that loop over and over. These codes calibrate and get feedback from 4 separate motion sensors, activate Wi-Fi and make frequent requests of data from NASA and a server (called MQTT) that holds any communication until a valid Wi-Fi handshake is made, control various pins (that do anything from trigger a relay switch to direct electricity from a large power supply, to modulating the signals that change each LED on the light strips, to telling time, and more). The main brain is a 2-layered stack consisting of an Hazzah32 micro-controller and Adalogger + RTC board made by a successful female-owned company called Adafruit.
Huzzah32 Feather with ESP32 wi-fi board & Adalogger RTC
This paragraph is jargon-heavy (sorry): The Hazzah32 is an Arduino friendly ESP32-based Feather, made with the official WROOM32 module. At the moment, it is meant for intermediate and above developers, as the documentation can be a little daunting. To its benefit, each of the pins can be hard coded to do several different functions. Truthfully, much of the time working on this project was learning how this new board worked and growing into the shoes worn by such an ambitious project.
The light strips are RGB WS2812b 5050 LEDs (often rebranded as Neopixels ). While the strips look simple, each bright spot is a module comprised of a tiny red, green, and blue LED + a little driver. This means that each color and light bulb has 3 uniquely addressable lights that can be controlled independently. In total, The Imagination Machine has 2,700 individually addressable LED lights and can modulate many colors with ease. I used a reworked version of the adaptable open source FastLed codes.
You’ll notice that I go through several iterations of designs, homemade boards, LED configurations, and layouts. The great size and technical scope of this project was purposely outside my normal comfort range. What you’re seeing is the honest proof that I really came up with the final goal and had to truly learn what I was doing along the way. It was an exciting and deep journey through many unknowns. I’m appreciative of all the new knowledge that was born from so many trials along the way.
The Imagination Machine June 2019 Medium: Reclaimed airplane wing, LED lights, Wi-Fi enabled Adafruit Hazzah32 micro-controllers, Adafruit Adalogger with Real Time Clock, PIR motion sensors, electronics, and poplar. 226” x 48” x Dimensions Variable
This plane is actually a bi-plane, meaning it has 2 sets of wings. Each set is split into 3 sections. The sections fold upwards (or come off completely), allowing for easier storage.
Getting the wings out of storage. The snow made for an interesting pick up.
Picking up the wing in the dead of winter from my family’s barn.
Months of programming went into this project. Over 27 pages of codes were written, most with the help of Staufs Coffee
V1 sensor + LED strip board
Checking codes on the Arduino Uno and Prototyping wing.
Using the Arduino Uno to drive the 5 V lights and the ESP32 to connect to Wi-Fi. The Arduino would later be dropped as it’s not entirely necessary.
Proof of concept with the lights in my studio. Simply held a few inches from the wing.
Tyler Cann, contemporary arts curator, Interviews with the local news at the museum.
My first real attempts at self-designed printed circuit boards. I learned so much. Unfortunately, due to a change in overall design, I didn’t end up using any of these.
Robotics work by Daric Gill
I like this board. And that purple!
Testing NeoSense 2 (homemade board).
Testing NeoSense 2 (homemade board). It works, but the layout is a little chunky still and there’s a slight flicker.
Starting to like these MC4 solar quick connects and high thread count silicone coated wire. Expensive little buggers though!
Settled on this arrangement for the lights, control panel, power supply, and fuse box.
A wood truss was built that maps the exact shape of each wing. The top remains flat while the long pieces of wood are scribed to fit closely to the wing.
Each wing has a detachable truss and electrical box encasement. This is so that I can transport it in sections. The wooden base would eventually be replaced by acrylic.
Work desk with all the parts
Dry fitting the wooden truss together to make sure it fits correctly.
Panorama of the workspace at night.
Laying the wings on the complete wooden truss for the first time.
Adafruit Adalogger + Huzzah32 micro controller and Arduino codes
Prototyping the arrangement of the control panel parts
A 3.3 v relay switch controls the power to the LEDs, keeping them separate from the other sensors.
All the components needed to make one of the control panels. Sans wires.
Side view of control panel
Version 1 of the acrylic electronics housing. The hinges and hasp added too much weight and not enough functionality to make it worth it.
Hand making metal brackets for motion sensor
Installing main power switch and daily timer relay.


")
")
")


")
")

You must be logged in to post a comment.